Showing posts with label Hot Foiling. Show all posts

Wednesday, November 12, 2025

Altenew “For You” and “Hello” Cards – Two Looks, Same Products with few Techniques

Hi everyone!
I’m excited to share a pair of floral cards today featuring Altenew’s products — and a fun twist on how one design can look completely different with just a change in technique and color palette.


Both cards use the same floral press plate and tag die, but one celebrates soft and delicate watercolor vibrance, while the other embraces elegant simplicity and clean lines. Let’s dive in!

I have listed the products below :)

 Card 1: Watercolored Tags – Bright & Playful


For this card, I used the letterpress system with the press plate onto watercolor paper. Die-cut two tags out of it. Then, I watercolored the flowers using Altenew’s Artists’ Watercolor, mixing pinks, reds and corals for a natural petal variation.


I added embossing paste through the Vintage Motifs stencil in the background.and the two tags are slightly offset for a dimensional layered look.

I finished with a sentiment from Build-A-Garden: For You, some black twine, and a few sequins for sparkle. 

Card 2: Sleek & Minimalist Tag Design


This card shows how elegant simplicity can be! I used glimmer hot foil machine to foil on the Brushed Copper cardstock.


Then, I die-cut the tag on a black card layer for contrast and added a bold white-embossed sentiment, “hello,” to tie everything together.

A few black enamel dots add just the right touch of texture and sophistication.

Final Thoughts
I love how these two cards showcase the versatility of  the same products — from soft watercolor feel to modern graphic minimalism.
Sometimes, all you need is a shift in technique, color and finish to create a whole new mood.

Which one speaks to your style — soft and colorful or clean and elegant? I’d love to know in the comments!

Discount Code: 

To celebrate today, I have an Exclusive Discount Code for my followers!

Code name: ISHAFREE

Duration: From November 12th - 19th. at 11:59 pm EDT

Offer: FREE Crafter's Essential Micro-Tip Tweezers ($8.99 value) on every order over $79

Instructions: Add the Crafter's Essential Micro-Tip Tweezers to your cart and use the code ISHAFREE at checkout to get it for free.

Link to Use: https://altenew.com/discount/ISHAFREE?sca_ref=6333953.TchYT5DdF6q (Note: This link is integrated with the code)

Thank you for dropping by and have a wonderful day!
Wednesday, March 26, 2025

Spellbinders - March DOM

Hello everyone! Today, I am sharing a card using the "Small Die of the Month " from the March 2025 Club Kits of the month from Spellbinders.
I love all the images in this set but these cute, playful fishes dies caught my eyes. I paired the sentiment from the Glimmer Club of March 2025 and some other products from the older releases. Rainbow Slice Tunnel dies for the greenery and Flowers from the Be Bold Blooms. I used the Matt Gold foil for the sentiment.
 
All the products are in the description box below.
 
 
I used distress inks to add the watercolor effect, and to add color to my die-cuts.
 

Tuesday, March 11, 2025

Pinkfresh Studio “Joyful Blooms” Release Blog Hop

Hello everyone! I'm so excited to join Pinkfresh Studio "Joyful Blooms" blog hop. As always this release is fully packed with beautiful products including fun Washi Tapes, Essential die etc, which are very versatile for a variety of styles. 
 

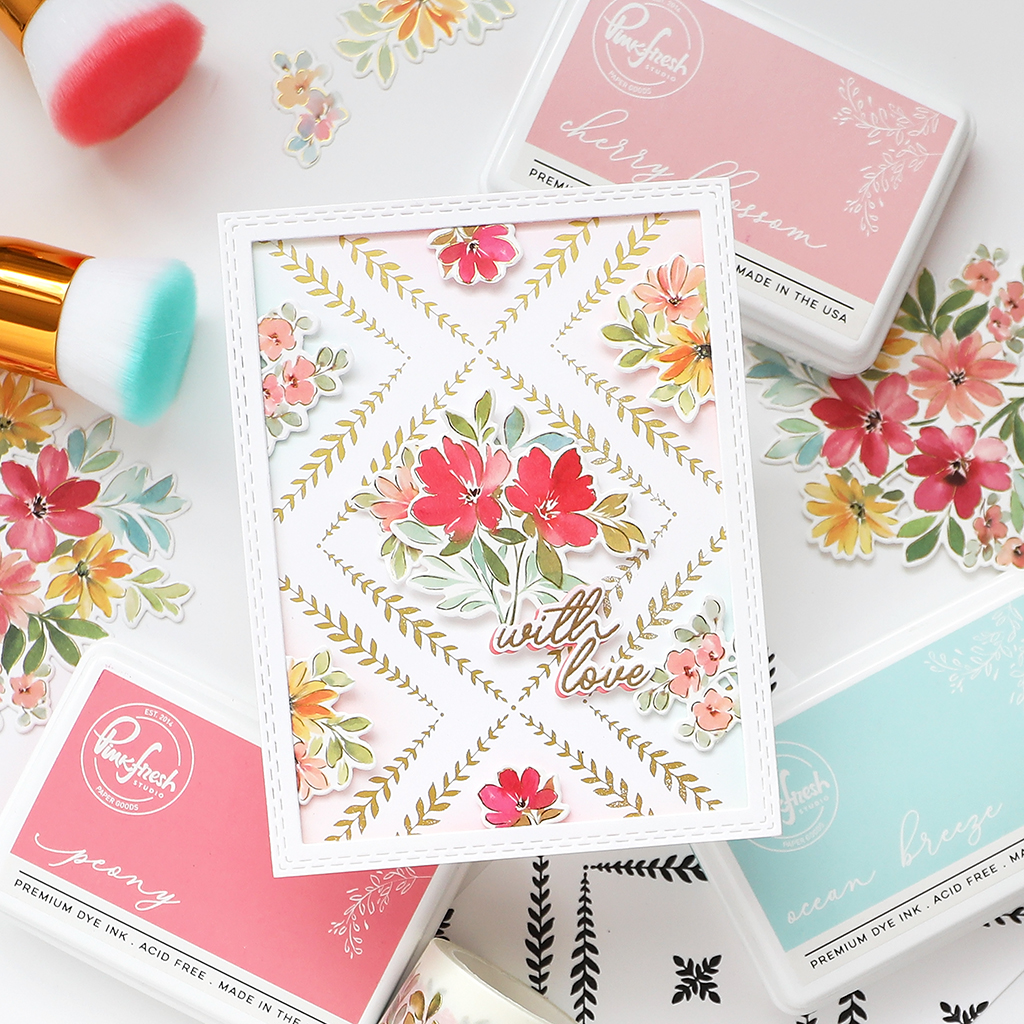
 I have two cards for you today, featuring the Flowers for the Soul Washi Tape (designed by Dawn from WPlus 9), Double Stitched Rectangle Essential dies, Leafy Lattice Press plate.
I have listed all the supplies at the end of the blogpost.
 

 For the first card
 
 
I used Sage ink and took the impression for the background using the Press Plate. Next, I die-cut the frames using two of the Double Stitched Rectangle dies, once using white card and then with the Gold Glitter cardstock.
 
 
Sponge the white frame using Sage ink. Adhere the gold glitter frame behind the colored frame slightly off-set. 
Sponge a panel using Lemon Whip and Cherry Blossom in, add vellum over it.

 
Adhere the Washi florals. Stamp and emboss the sentiment using gold embossing powder. To finish, add some Iridescent Dew Drops.
 
For the 2nd card, I decided to use gold Matte Foil with the press plate. I foiled the background using the Glimmer Hot Foil System.
 
 
Adhere the washi to a white card, die-cut. Sponge Peony, Cherry Blossom and Ocean Breeze inks behind the clusters. 

 
I stamped and embossed the sentiment using gold ink. Sentiment is from the Steeped in Kindness stamp set from the new release.
 
 
GIVEAWAYS:
Pinkfresh Studio will be giving away the full release on the Pinkfresh blog & YouTube channel.

As well as a total of TEN $50 gift cards along the hop. As usual with blog hops - the winners will be picked from the comments.
Pinkfresh Studio will pull the winners & post them on March 19, 2025 on their GIVEAWAY PAGE.
Don't forget to check that page & claim your prize within 2 weeks.


Here is the link to complete HOP list
CLICK TO ENTER HERE

Friday, January 12, 2024

Pinkfresh Studio - Press Plates Three Ways

 Hello crafty friends. I am so honored and excited to be joining the Pinkfresh Studio team. I am sure by now you have the GORGEOUS press plates from the December release on your crafty desk.

I decided to share three ways to use them and for someone who doesn't own a Betterpress Letterpress system yet, don't shy away from getting your hands on the press plates as you can use them with your manual die-cutting machine too.


I started by creating the background wash using the Pinkfresh watercolor paper and inks (these will be available soon), let it dry. Now use the Ornate Trellis press plate as you would while embossing with a die. Run it through the die-cutting machine and we have a beautiful embossed background.

Next, I used the Floral Octagon Frame plate, inked with Pinkfresh detail black ink and took the impression onto the watercolor paper. Die-cut this using the coordinating cuts. I then, cut this into four pieces and adhered to the corners of the panel using 3d foam. 

The 3rd. way to use the press plate is with the hot foil machine. So for the sentiment, I used the Favorite Things sentiment, foiled and die-cut using the coordinating cuts.

Die-cut the leaf cluster from vellum and the Glacier Glitter cardstock using the Curvy Leaves dies. Assemble everything together. To finish I added Enchanted Forest Ombré Glitter Drops. 


Thank you for stopping by and I hope this card gave you ideas on using the press plates even if you don't have the system yet.