Friday, May 31, 2024

Pinkfresh Studio “Happiness” Release Blog Hop

Hello everyone! I am so excited to join Pinkfresh Studio "Happiness" release bloghop. This release has a lot of products for a variety of styles.
 

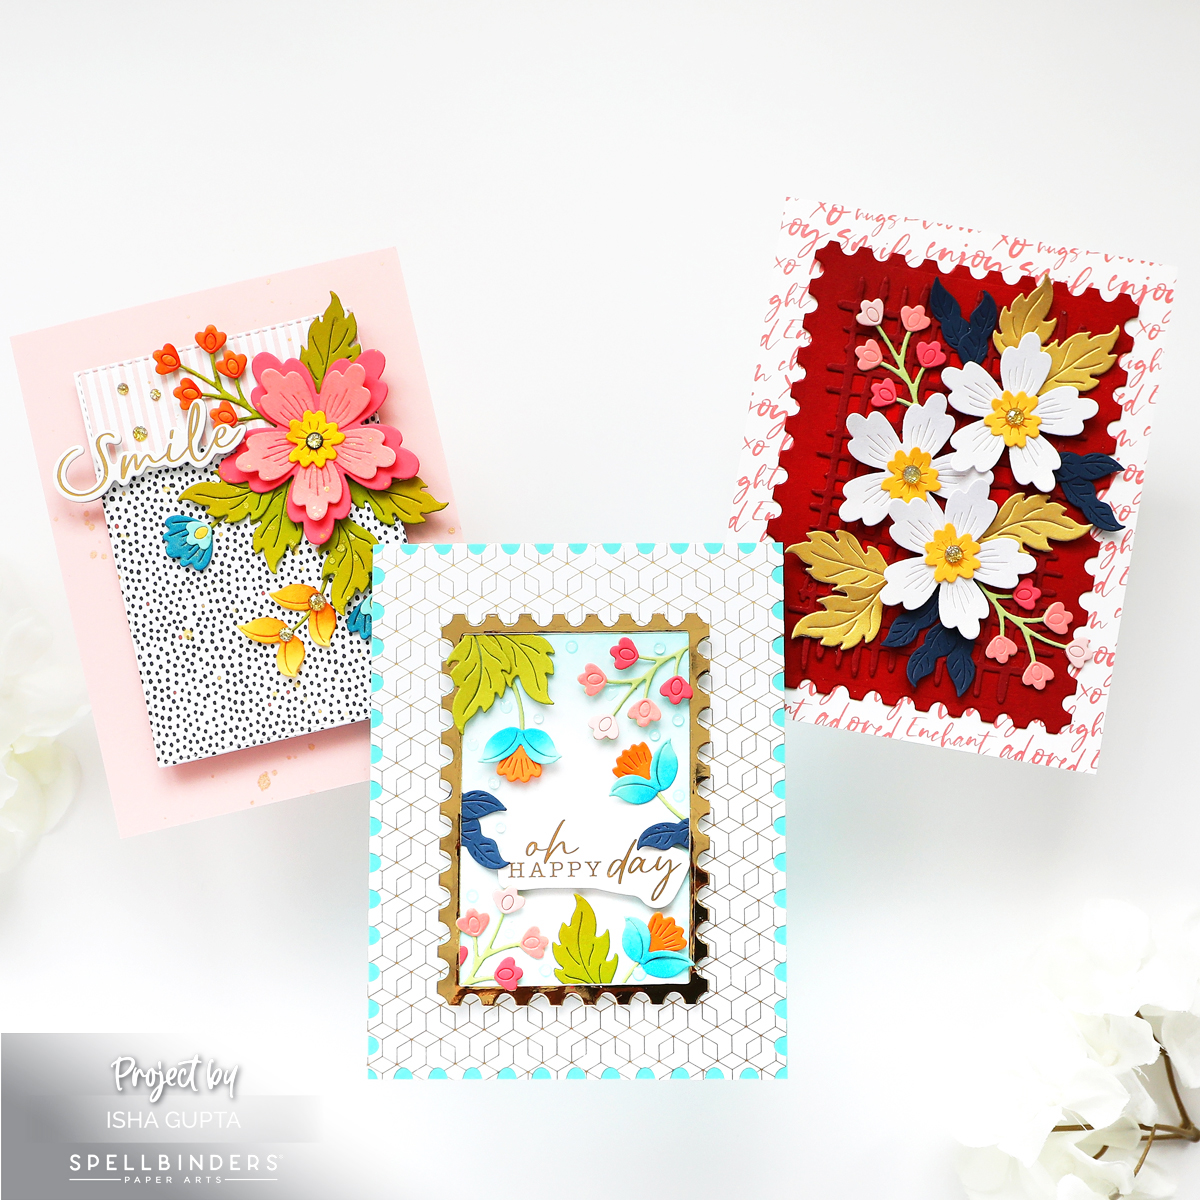
I have two cards for you featuring the Be Fearless stamps and dies, Border stencils, Decorative Frames and the sentiments from the Beautiful Branch stamps and dies.

I have linked all the products below

For my first card, I created a watercolor wash using Pinkfresh new watercolors and watercolor paper (releasing soon). I then used one of the patterns from the Border stencils and sponged sage, peach fuzz, sparkling rose inks through it. 

Stamp the image from Be Fearless stamp onto watercolor paper, using Calico white ink, sprinkle white embossing powder, heat set. Color using the watercolors, let dry. Die-cut using the coordinating dies.

 Use the Decorative Frames press plate with black ink and take the impression. Die-cut using the coordinating dies. Use one of the frame and adhere to the card using foam tape. Adhere the flowers, stamped sentiment and some Blush clear drops to finish the card.

For my next card, I stamped the image using black ink. Then, I used the layering stencils and sponged peach fizz, peony, sparkling rose, ocean breeze, waterfall, paradise inks.

Using the last of the stencil for florals, I applied some glitter paste to it and let dry. Die-cut the images. I also stamped the image onto vellum, white heat emboss and die-cut.

I used black ink and sponged it through the diagonal stripes onto white card, clean the stencil and turn it to the reverse side and sponge ink again to get the pattern. 


Die-cut the arch from a peach card. Using a size smaller of the arch die, die-cut onto the Glacier glitter cardstock. Adhere all the layers to a white cardbase. Next add the images and the sentiment. To finish I added some Pixie Dust ombre glitter drops.

GIVEAWAYS:
Pinkfresh Studio will be giving away the full release on the Pinkfresh blog & YouTube channel.
As well as a total of TEN $25 gift cards along the hop. As per usual with blog hops - the winners will be picked from the comments.
Pinkfresh Studio will pull the winners & post them on June 11, 2024 on their GIVEAWAY PAGE. Don't forget to check that page & claim your prize within 2 weeks.

In celebration of this brand new release, you can get the Peony Fantasy hot foil plate for FREE with all orders $50+ (BEFORE SHIPPING)! You don't need to add it to your cart or use a code - everything will be taken care of automatically. All you have to do is shop! 
 

Here is the link to complete HOP list
CLICK TO ENTER HERE

 Thank you for dropping by and have a nice day! 

Spellbinders - Bayfair Collection

 Hello everyone! I am sharing a few cards using products by Spellbinders from the Bayfair collection. It was fun to combine the gorgeous floral dies with the patterns from the paper pad and the sentiments from the stickers pack.

For the first card I kept the flower dies as my focal point. I used two patterns from the paper pad to create the background. Die-cut flowers and leaves using various colors of cardstock and adhered to the card. To finish, I added some flicks of gold ink. The sentiment is from the sticker sheet, love the gold foil look.

For the next card I die-cut the pattern paper using the postage die. I also created a frame using the dies from the mirror gold cardstock. I used some of the floral and leaves dies and adhered them to the direction of the sentiment.

For the last card, I used a deep red cardstock, sponged aged mahogany and fired brick distress ink to the edges. I also used the Lattice die from the Lisa Horton collection. Create the floral cluster using colors of your choice.


Hope you liked the creations. Thank you for dropping by and have a nice day!

Friday, May 24, 2024

Pinkfresh Studio - One Layer Card using Masking technique

Hello crafty friends! Today I am on the Pinkfresh Studio card blog with a colorful one layer card using the masking technique. I feel, sometimes we need one layer cards for easy mailing and this is where this masking technique comes to play. I used the beautiful Amazing Things stamps, dies and stencils.

I started by stamping the image twice using the Detail Black ink and the Amazing Things stamp set onto a white panel. Next, I used the Amazing Things Stencils and added inks to the image. I used the Blending Brushes (1/4th and 1/2 inch).

Ink colors I used:

Flowers (Lemon Whip, Apricot, Sparkling Rose, Bubble Gum, Berrylicious, Candy Violet, Waterfall, Sapphire)

Leaves (Grassy Knoll, Key Lime, Waterfall, Berrylicious, Sapphire)

Next, using the Amazing Things dies, I die-cut two masks from masking paper. You can use copy-paper instead and adhere it with temporary adhesive Adhere the masks to the image. Sponge Sky Blue and Waterfall ink to the background. Flick some water and white paint and let it dry.

Remove the masks and see the beautiful one layer image with white outlines. Stamp the sentiment from the Joyful Day stamp set. 

To finish, adhere some Ice clear drops and adhere this panel to a white cardbase.

Hope you liked the process of easy to mail, one layer card. Thank you for dropping by and have  nice day!

Thursday, May 23, 2024

Spellbinders - Hello Cards

Hello everyone! I am sharing two cards today featuring some products by Spellbinders from the Lisa Horton Frames and Florals Collection.

All the products are linked below

I love the Woven Lattice texture as it gives a perfect backdrop for the Layered Anemone floral dies. I also used the A little Hello sentiments along with the Hello die.

Card 1

I started by die-cutting the florals, added distress oxide inks to them and layered them.

I used black copic marker for the center piece. Die-cut the lattice die in white. Take a white panel, sponge some peacock feathers and salvaged patina ink. Flick black paint. Die-cut the word HELLO in white and the shadow in black. Adhere the sentiment using 3d foam.

 Arrange the flowers and leaves. Adhere this panel to a light pink cardbase.

Card 2

For this card I went with a rainbow theme onto a black cardbase.

I die-cut the floral layers, sponge distress oxide inks (I have all the products listed in the link below)Adhere the lattice to the card. Die-cut the word Hello and add versamark ink, sprinkle gold embossing powder and heat set. Adhere it to a white shadow cut.


  Assemble the flowers. Flick gold paint. 

Thank you for dropping by and have a nice day!

Tuesday, May 14, 2024

Sunny Studio - Welcome Baby

Hello everyone! I am on Sunny Studio blog today with a clean and simple baby card featuring the Tropical Birds stamps and dies. The birdies in this set are so versatile.


I started by die-cutting an arch using the Stitched Arch dies. Sponge peacock feathers and salvaged patina distress oxide inks. Stamp the images from the Tropical Birds stamp set, color using copic markers and die-cut using the coordinating dies.

Stamp the leaves onto vellum using versamark ink, sprinkle green embossing powder and heat set. Die-cut some white flowers and add to the branch.
 

Take a white card base, sponge yellow ink around where we will have the arch. Adhere the arch to a white card, adhere the images to create the scene. Die-cut the clouds from the Baby Elephants stamp set, stamp the sentiment. Add some nuvo glitter to the bottom of the clouds. Adhere to the card.

To finish, add some glitter drops to the center of the flowers.

Thank you for dropping by and have a nice day!

Friday, May 10, 2024

Pinkfresh Studio - Partial Die-cutting Technique Cards

Hello everyone! I am happy to be back on the Pinkfresh Studio Blog today with two cards featuring the partial die-cutting technique. The Never Give Up stamp is perfect size for the technique and the Joyful Day and Diagonal Plaid press plate complimented the project beautifully. The challenge theme for May is "Flowers", so this is an added motivation to use these gorgeous floral image.


To start with, I used the Diagonal Plaid press plate and created the pattern using Peach Fizz and Coral Reef ink with the Better press system. 

I then stamped the image from the Never Give Up stamp set using Detail Black ink. Use the coordinating die and instead of putting the second cutting plate above it, I used the cutting plate from mini die-cutting machine and put it on the center of the panel. This would cut only the center parts of the die, remove the extra using a craft knife to get the straight edge.
 

Take this panel and using the coordinating stencils sponge inks (Grassy Knoll, Paradise, Soft Lilac, Begonia, Coral Reef, Mulberry Blush, Peony, Sparkling Rose, Raspberry Bliss) to the image. 

Stamp the leaves from the Joyful Day stamp using watermark ink onto vellum, sprinkle opaque white embossing powder and heat set. Die-cut using the coordinating dies. Adhere parts of it behind the floral image.

 
Next I added vellum to the plaid piece to soften the background. Adhere the floral panel using foam tape.


Stamp the sentiment from the Joyful Day stamp, die-cut. Add a coral color die-cut slightly off-set and using 3d foam add to the card.
To finish, I added some Ombré Pixie Dust glitter drops. 
 

For the next card, I stamped the image to a white panel onto one corner using watermark ink, sprinkle opaque white embossing powder and heat set. Now put the coordinating die in place but put the second cutting plate on an angle towards the lower edge only. This would die-cut only the lower part of the image. Add color using stencils with these inks (Sage, Eucalyptus, Sunkissed, Peony, Soft Lilac) 

 
Sponge a panel using Sunkissed, Sheer Freesia and Soft Lilac ink. Stamp the image using sunkissed ink. Using the stencil, tap white ink to the leaves and the small flower. 


Adhere the embossed vellum leaves to the back of the floral panel and then this panel to the inked panel using foam tape. I used the sentiments from the Joyful day stamp.

To finish, adhere the panel to a white cardbase and add some Champagne clear drops and Ombré Twilight glitter drops.

Hope you enjoyed the technique. Thank you for dropping by!

Tuesday, May 7, 2024

Sunny Studio - Hello Friend

Hello everyone, I am on Sunny Studio blog with a CAS card featuring the Big Panda stamps and dies. This stamp set is gorgeous with beautiful accessories to go with the theme. I decided to create this card for a friend.

I started by die-cutting three circles using the Stitched Circles Large and Small dies. I then sponged picked raspberry, wild honey and dried marigold distress oxide ink to them.  Adhere to a white card base.

Stamp the images, color using copic markers and die-cut using the coordinating dies.

Big Panda, hat, drink and sentiment - Big Panda stamp and dies

Small Panda - Panda Party stamp and dies

Small drink - Tiki Time

Adhere the images to the card using 3d foam. To finish, I added some sequins. Thank you for dropping by and have a nice day!