Friday, October 30, 2015

SugarPea Designs Trick/Treat Blog Hop

Hello and welcome everyone! We at SugarPea Designs have a lot of fun for you today as all the spooktacular team of designers have concocted up some frightfully sweet tricks and treats. As you "Trick or Treat" by stopping by each of our designers blogs, you'll not only be treated to some amazing paper crafting eye candy, but you will also receive some faBOOlous TRICKS and TREATS along the way. 


Wendy has started things off by giving you your first treat by offering everyone 15% off your entire order this weekend by using code: BOO2U  Expires: Midnight EST - November 1, 2015


Happy Halloween!  Thanks for stopping by my blog today.  For my card I used Eek-A-Boo and Watercolor Brushstroke stamps along with Sugar-cut Woodgrain Journal card!


I have a TRICK for you. I made my own "Glow in the Dark" paper and I wanted it to look translucent for my ghost. So, I dab some VersaMark ink directly onto a scrap of vellum and applied Glow in the Dark embossing powder from WOW! Embossing Powder and embossed it. Don't forget to keep your heat gun moving. Once this was cool, I repeated the same process once more....you will see how wonderful it glows in the photos below :) I stamped the ghost image using StazOn black ink.  


Also, using Neon inks gives more spooky feel to this cute card...lol And I love the ImagineCrafts Radiant Neon inks :)


This is so much fun for kids cards. Even I am enjoying it...lol

Are you ready to do more Trick or Treating!
Don’t forget to leave a comment at each designers blog for your chance to win one or our 4 TREATS. Winners will be announced in a special blog post, Monday, Nov 2nd.


Thursday, October 29, 2015

Make Amazing: Shaker Card

Hello everyone! 
Today, I have a card for you featuring some awesome products "Celebrations by Richard Garay" I used the stamp and die set combo, and used the die to create masks, so I can make my own patterned paper background.


This is how I created my shaker card:


1. Make a cardbase out of whip cream cardstock. 
2. Cut a mat layer. 
3. Die-cut the clouds onto post-it pad to use them as mask. 
4. I sponged Sea Spray ink to create the light cloudy background. 
5. Die-cut a circle using the pierced circles die. 
6. Stamp the Sun using Summer days ink, onto the yellow cardstock from the Assorted Solids paper pack. die-cut and apply Journey glaze over it. Let dry.
7. Stamp sentiment using black and summer days ink by masking it partially.
8. Place the mat layer onto the cardbase to position and adhere the die-cut sponged center circle positive.
9. Apply journey tape to the back of the mat layer and adhere a piece of acetate.
10. Apply 3D foam tape all around the circle and fill in some clear sparkle sequins and blue beads. 
11. Adhere cardbase to this layer.
12. Adhere the Sun image on the card front over the acetate.

This is how it looks in close-up


Supplies:

True Fusion Ink: Summer Days, Black Licorice
Cardstock: Whip Cream; Clear View sheets
Journey Glaze

Thanks for stopping by!


Wednesday, October 28, 2015

Chameleon Pens/ Lawn Fawn Blog Hop

Hello Everyone. This week Chameleon Color tone pens and Lawn Fawn are having a blog hop. Today is the first day. I have a card at the Chameleon Blog HERE.
Here is a peek of my card and you can check the full tutorial on the Chameleon blog.


Don't forget to comment on the Chameleon blog and make sure to stop by at Lawn Fawn Blog all week and leave a comment. Don't miss your chance to win.


Head on over to the Chameleon Pens Blog HERE and comment for a chance to win all week. Make sure you also stop by the Lawn Fawn blog all week and comment. Don't miss your chance to win.

Monday, October 26, 2015

Make Live Share Canvas

Happy Monday my friends!! Hope you all had a wonderful weekend :) Well most of mine went in bed coughing :( Nevermind, I am feeling a bit better today and the bright weather makes it much more enjoyable!!

Talking about enjoy....as I mentioned before, a couple of weeks back I was able to attend the Team Richard Garay retreat in Phoenix and "Enjoyed" my trip a lot. It was a lot of learning, making new friends, and of-coarse some crafting :)
We got to craft in the Journey Station craft room using all new to me products from the Richard's Celebration line and Fun Stampers Journey products. While crafting was fun, I was so nervous and wasn't even able to think as this was my first time crafting with/in-front of anyone...lol. But everyone was so amazing and made this into one of the best crafty times for me :)

So here is the canvas we got to create. I used some fun colors of patterned papers, some modelling paste to add dimension using stencils. Our group photo from the day when we had a small swatch making session in Richards craft room!

Here are a couple more photos 


We also have a video, where Richard shares about the project we recreated along with all the fun happenings :)


Thank you for joining in my fun today! 

Friday, October 23, 2015

Make Live Share!

Hello everyone! I am so excited to share my first project inspired by Richard Garay's "Make Live Share" movement. What is that you might ask. Well, I was unaware of it too. I was at the Journey Station in Phoenix a couple of weeks back and got to know about the company, products and various Artists/people and Richard's "Make Live Share" movement. The idea behind this is to share our passion of craft and creativity with others.

I liked this idea of a "mobile", which Richard shares in THIS video, and decided to create a surprise for my younger daughter as she loves mobiles. She would often come to my crafty table, look at what I was creating and ask if she'd get a card too. So, as I created this while she was away at school (hehe) she was totally surprised when she saw what I had for her ;)


Here is how I created it:


I used Celebrations collection by Richard Garay  and some of the Fun Stampers Journey products to create this project. First I die-cut 12 of each size of flowers using the patterned paper and lots flower centers using  the solid colors and some glitter cardstock. The Journey Platinum machine makes it so easy to cut everything faster.


Then, I sponged the edges using Watermelon Fusion ink.


I sandwiched the flowers to the green twine.


Then adhered the flower centers (cut from glitter cardstock) using 3D foam squares.


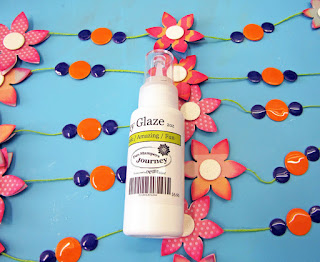
In-between the flowers, I adhered the solid color circles and applied some Journey Glaze. I looove this product, it give such a nice and  special glaze :)

I then die-cut the fringe and cut it from the center.


Adhered some white liner and adhered the fringe to the top circle of the mobile.


Look at her smile when she got it :) This idea is so much fun and what's better than seeing a smile on the recipients face with our handmade creation :) Hope this leaves you wanting to join Richard's movement to create and share!!
Thank for stopping by!

Tuesday, October 20, 2015

Thank You

Hello Everyone! Today, I am on the Scrapbook Adhesives by 3L blog with a Thank You card. 
You can check the step out on their blog. Today other than the awesome adhesives, I used some new to me products "Celebrations by Richard Garay" and I have to say that I am loving them :) You can check all about Richard in THIS post of mine.


Supplies: 

Stamp: Many Words, Sweet Treats (Celebration by Richard Garay); Dies: Sweet Treats, Just Because, Pierced Rectangle (Celebrations by Richard Garay); Ink: VersaMark, StazOn Black, Kaleidacolor (ImagineCRAFTS featuring Tsukineko); Embossing Powder: Opaque Bright White (WOW! Embossing Powder)

Monday, October 19, 2015

Bear Special Friend

Hello Everyone, I am so excited today as this is my first card as part of Waffle Flower Challenge Design Team :)
This month we challenge you to use embossing in your creations. Heat Embossing, dry embossing, embossing paste, using your dies to emboss....looking forward to see your creations. We have some Gorgeous creations by some of the talented ladies and we still have time so, hope you will join us.


For my card, I used embossing onto the background to use it as resist for the watercoloring. I also embossed feather onto the vellum to create a backdrop for this adorable bear image. I embossed the sentiment onto the black cardstock :)


I used Tribal Bear stamp set for my card. I used the colors from the inspiration photo below:


Challenge ends on the 25th of each month. You can link up your creations and will find all the information along with the prize info. on the Waffle Flower Cards Blog HERE.

Supplies: